
Installing a Deck/Patio (MPB) Base
Installing a Deck/Patio (MPB) Base
Step 1: Deck/Patio Base Mounting Assembly
Watch video —Install an MPB Posts
- Turn base on edge and insert the 2′ post. Align the notches in the post with the notches in the base.
IMPORTANT: You maybe need to tap the top of the post to seat it completely in the base socket which will then align the bolt slots. - Fasten post to the base with four 1/4-20 x 3/4″ Hex bolts, washers and Kep nuts. Follow exact placement of washers as indicated. Tighten securely.
- Attach the tube clip with the 8-32 self-tapping screws either on the right or left side of the base depending on the direction of your gas supply line.

How To Videos
INSTALL AN MPB POST
MPB ASSEMBLY
MPB Quick Disconnect Method
We do not recommend the quick disconnect method but if you choose to use this method please watch this video to see the correct way to install.
Step 2: Deck/Patio Mounting Installation
Position the patio base at the desired location on a deck or patio.
![]() CAUTION: Be certain there are no combustible materials closer than 18″ away (above, behind, left or right).
CAUTION: Be certain there are no combustible materials closer than 18″ away (above, behind, left or right).
- Mark the location of the four holes at the outside corners of the patio base and drill four holes. The base will be fastened down with lag bolts (not supplied by MHP) after you have connected the gas supply line. The top post notch should be at the front of the grill and the rear access door will be in the back of the grill.
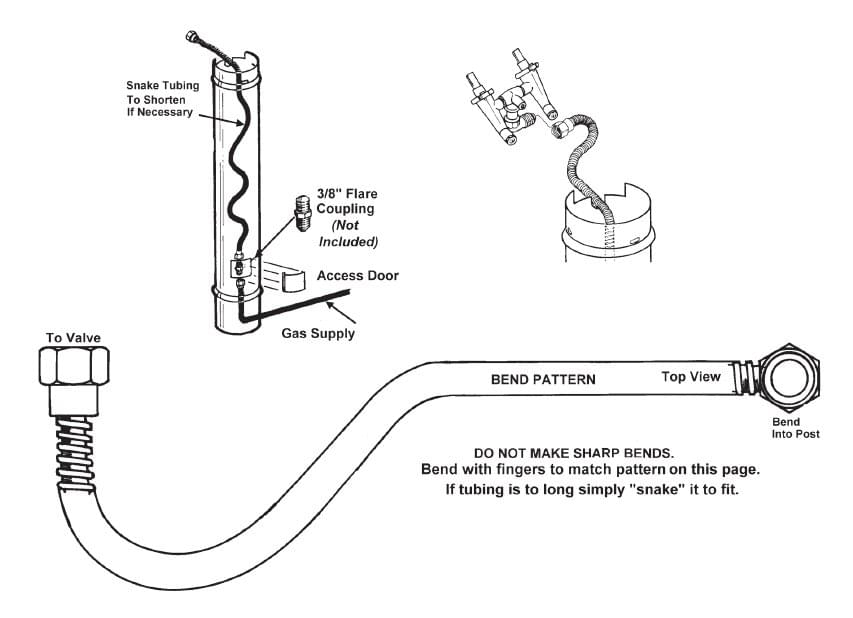
- Run the gas supply line into the post from the bottom to reach the access door and bend it 90˚ to exit the base at either notch. The patio base is notched on two sides to allow the gas line to exit either right or left.
- Secure the gas line with the tube clip. (Option: On a raised deck if the gas supply line is to be run straight up into the post from below, use the tube clip to attach the gas line to the deck for support.)
- At the access door connect a 3/8″ flare coupling (not supplied by MHP) to the gas supply line and Stainless Steel tubing. Position the tubing in the top-notch of the post. Bend the tubing at the top end to match the Feed Line of the grill valve. Do not kink the tubing.

Step 3: Attaching the Grill Head Bottom to the Deck/Patio Post
- To make the post-to-flange connection easier, remove the grill burner by taking our the small clips located under the bottom portion of the grill head. This will allow access to hold the Kep nuts inside the post.
- Set the grill head bottom carefully in place, align holes and use the 1/4 – 20 x 3/4″ bolts and 1/4 – 20 Kep nuts to attach the grill flange to the post.
- Mount the grease cup holder to the rear flange hole with a 1/4 – 20 x 3/4″ bolt and 1/4 – 20 Kep nut. The grease cup holder is supplied with the grill head.


Share Post